Blog migrated to Cloudflare Workers
This blog just migrated to Cloudflare Workers, Cloudflare’s serverless edge computing solution, because you know, it rocks.
This is the workflow I had in mind:
- I write a new blog post using markdown.
- I can test things locally before going live.
- When done, I git add the new post to my repo, then push it to Github.
- Website gets burned to static files.
- Website is published to the cloud at Cloudflare.
- I get a success/failure notification in my Telegram.
- Done, it’s live.
My goal was to fully automate this sequence of events.
I’m using a Jekyll, a popular static site generator, Github and Github Actions, Wrangler, and Cloudflare Workers (Sites) combo.
This is how I did it, tech-wise, step by step:
Installation
First, you can clone this repo.
git clone [email protected]:celso/celso.io.git
Then instal install wrangler, a CLI tool to operate the Cloudflare Workers, Jekyll, and its dependencies, using bundler.
cd celso.io
npm i @cloudflare/wrangler -g
sudo gem install bundler
bundle install
Cloudflare Tokens
Then you need a Cloudflare account (free) and a Cloudflare Workers Bundled subscription, which will give you access to the Workers KV (which is where your blog will be stored at the edge). Bundled is notably cheap and will provide you with access to the lowest latency in the network. Also, you get increased CPU time limits, which enable other interesting applications you can do in the future.
You also need to add your website or blog domain to Cloudflare, which is free. Here’s how.
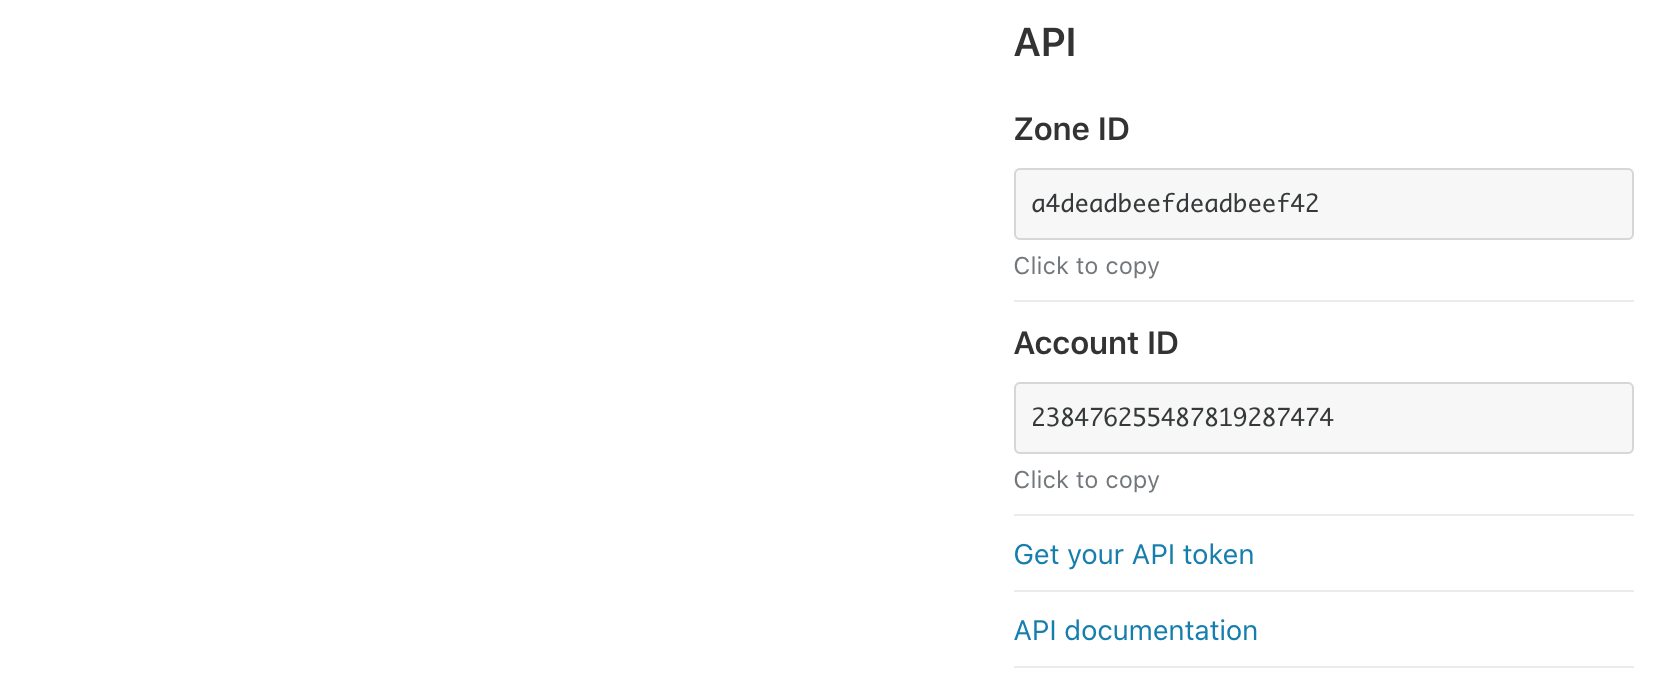
Now you need to get the following info from your Cloudflare dashboard.
- Account ID
- Zone ID
- Workers API token
This one’s easy. It’s your Cloudflare account e-mail.
Account and Zone ID
You can find both your account and zone IDs when you log into Cloudflare and select your zone, in the right column of the page.
API token
To get an API token, go to your profile page (top right corner), and click the “API Tokens” tab.

Now click the “Create Token” button, then use the “Edit Cloudflare Workers” template. In the next screen, you can restrict the token to a specific account and zone. Choose the account and zone that correspond to your website domain. Click “Continue to summary.” Click “Create Token.”
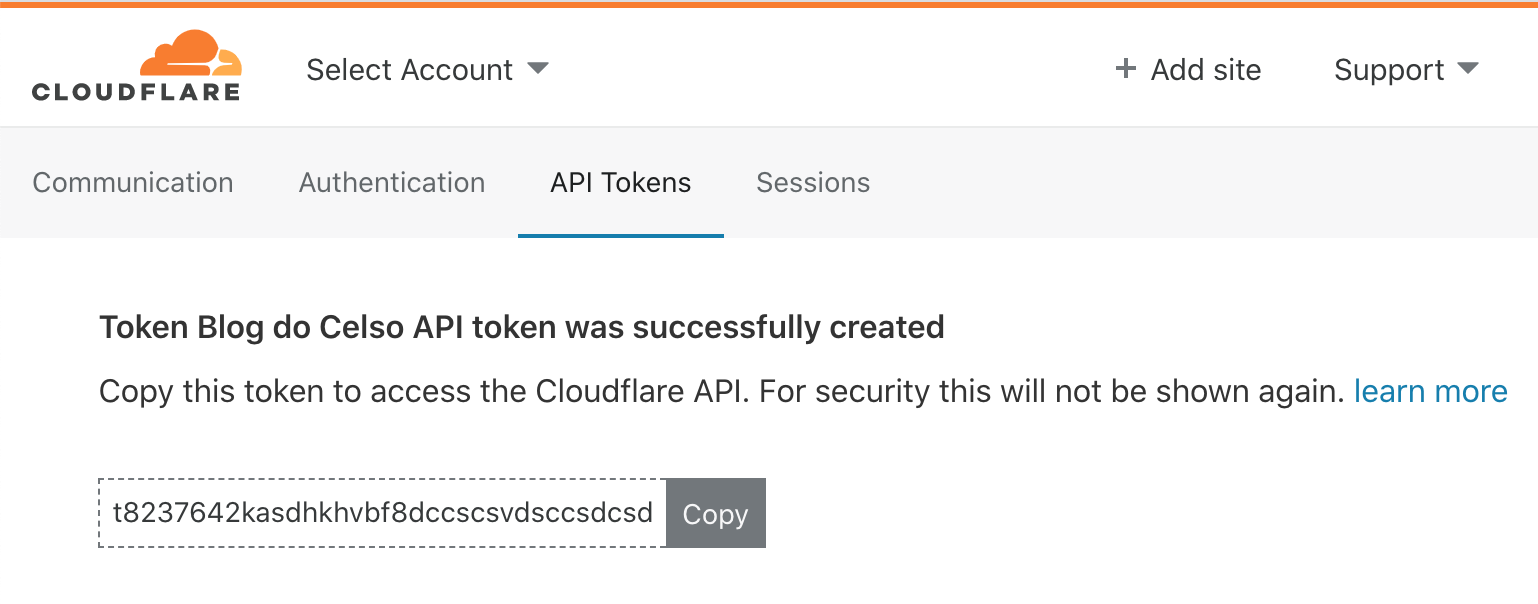
Copy the token; you’re going to need it.
Wrangler
Wrangler is a CLI tool from Cloudflare that you can use to build, preview and publish your Worker code. You can check Wrangler’s documentation here.
In a new project, you’d use something like this to initialize a wrangler template for a Worker site.
wrangler init celso-io --site
This will both create a wrangler.toml file and a workers-site subdirectory with the source code that will handle your website’s requests. You can go through this source if you want to understand how the engine interacts with the Workers KV database (where your blog static files will be stored) and serves each HTTP request.
My repo was previously initialized, you can check my wrangler.toml file:
name = "celso-io"
type = "webpack"

[env.staging]
workers_dev = true

[env.production]
workers_dev = false
route = "celso.io/*"

[dev]
port=9000
ip="127.0.0.1"

[site]
bucket = "./_site"
entry-point = "workers-site"
You can find more information about the configuration options here. As you can see, I make use of the environments feature. I also don’t have any IDs or keys in the configuration. These will be passed through shell environment variables both with local development, staging and production. More on this later.
Routes
To run your worker code with each request on your domain, you need to configure a worker route in your Cloudflare Dashboard. Go to your account, click the “Workers” button in the top navigation bar, and then click “Add route.” Here’s mine:
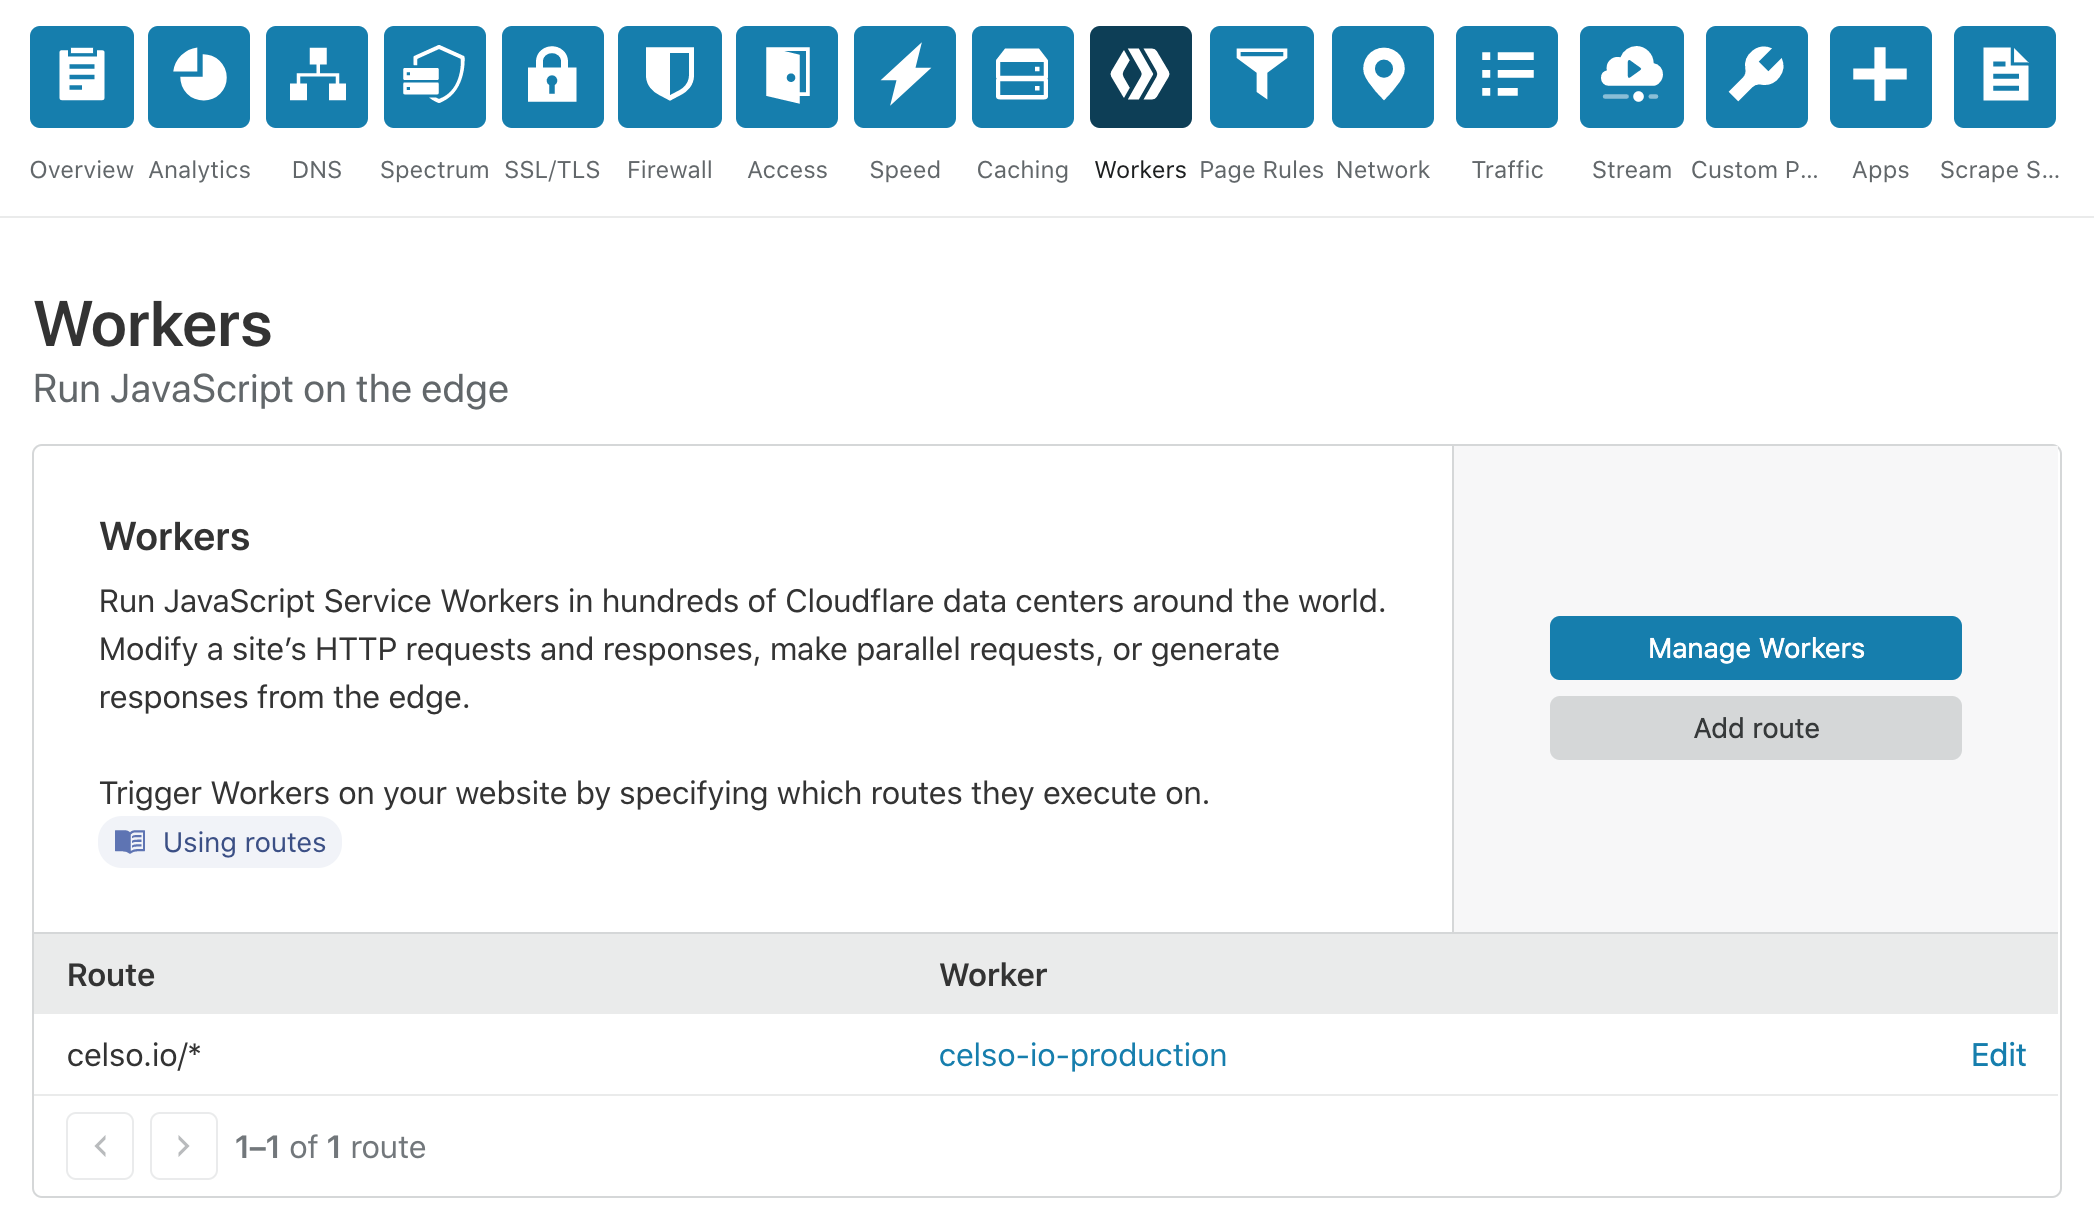
You can only configure your route after you publish your worker using wrangler; otherwise, it won’t show up in the dashboard. If you look at my wrangler.toml, you’ll find the same route regexp. In my dashboard screenshot, you can also see that the configured route corresponds to the [[worker.name]][[-worker.env]] nomenclature.
Read this document to know more about Routes.
Environment variables and tokens
I didn’t want any secrets or IDs in the source code or configuration files, so I found a way to pass this information to wrangler using environment variables under different contexts. Here’s how.
Get your previously configured Cloudflare tokens ready.
Local testing and staging
For this, we’re going to use a dotenv file. Create a .env file in the root of your project, like this:
cat .env
CF_ZONE_ID = "b5xxxxxxxxxxxxxxxxxxxxxc3"
CF_ACCOUNT_ID = "13xxxxxxxxxxxxxxxxxxxxx03"
CF_API_TOKEN = "SQxxxxxxxxxxxxxxxxxxxxxxxxxxxxxxxxxxxxFv"
CF_EMAIL = "[email protected]"
.env files are local only and must be git ignored, they should never get into your repository.
That’s it.
Production
Introducing Github Actions, Github’s CI/CD feature.
GitHub Actions allow you to automate your software deployment workflow. It’s powerful, simple to use, and guess what, it has an incredibly generous free tier that anyone can use (2,000 free computing minutes per month).
A Github action is basically a workflow consisting of a list of tasks running in sequence. The workflows use what Github calls runners, which are Linux containers running your software on their VMs cloud. You can trigger a workflow on any Github event (ex: a git push to your repo).
Check this page for more information.
Here’s my workflow:
{% raw %}
name: Deploy blog to cloudflare
on:
    push:
        branches:
            - master

jobs:
    build:
        name: Building
        runs-on: ubuntu-latest
        steps:
            - uses: actions/checkout@v2
            - name: Use Github Actions cache
              uses: actions/cache@v1
              with:
                  path: vendor/bundle
                  key: ${{ runner.os }}-gems-${{ hashFiles('**/Gemfile.lock') }}
                  restore-keys: |
                      ${{ runner.os }}-gems-
            - name: Burn jekyll website
              run: |
                  sudo gem install bundler
                  bundle config path vendor/bundle
                  bundle install
                  bundle exec jekyll build
            - name: Publish to Cloudflare
              uses: cloudflare/[email protected]
              with:
                  apiToken: ${{ secrets.CF_API_TOKEN }}
                  environment: 'production'
              env:
                  CF_ACCOUNT_ID: ${{ secrets.CF_ACCOUNT_ID }}
                  CF_ZONE_ID: ${{ secrets.CF_ZONE_ID }}
                  CF_EMAIL: ${{ secrets.CF_EMAIL }}
            - name: Telegram notification
              if: cancelled() == false
              uses: xinthink/[email protected]
              with:
                  botToken: ${{ secrets.TELEGRAM_BOT_TOKEN }}
                  chatId: ${{ secrets.TELEGRAM_CHAT_ID }}
                  jobStatus: ${{ job.status }}
                  skipSuccess: false
{% endraw %}
Before we proceed, you need to go to your repo settings in Github and click the “Secrets” tab in the left sidebar. You then need to add your secrets for:
- CF_ACCOUNT_ID
- CF_API_TOKEN
- CF_EMAIL
- CF_ZONE_ID.
You can optionally add:
- TELEGRAM_BOT_TOKEN-
- TELEGRAM_CHAT_ID
This tells Github to store your tokens and keys securey, in their password manager. You can then use these in your workflows, as environment variables.

Telegram
My final workflow step is to send me a Telegram message with the result of my blog publication. You can skip this step if you want. If you want to use it, then you need TELEGRAM_BOT_TOKEN and TELEGRAM_CHAT_ID.
To get the TELEGRAM_BOT_TOKEN, you need to create your own bot first. Here’s how to do it.
Now create a Telegram group and add your newly created bot to it. Then do this to discover your TELEGRAM_CHAT_ID.
Workflow step by step
Going back to my workflow.
I’m running a ubuntu container with five steps.
Step 1: actions/checkout
- uses: actions/checkout@v2
actions/checkout checks-out your repository so that the rest if the workflow can use it.
Step 2: actions/cache
{% raw %}
    uses: actions/cache@v1
    with:
        path: vendor/bundle
        key: ${{ runner.os }}-gems-${{ hashFiles('**/Gemfile.lock') }}
        restore-keys: |
            ${{ runner.os }}-gems-
{% endraw %}
actions/cache is an optional cache module to improve your workflow build times.
Step 3: burn jekyll website
    - name: Burn jekyll website
      run: |
          sudo gem install bundler
          bundle config path vendor/bundle
          bundle install
          bundle exec jekyll build
There are a few Jekyll actions in the marketplace, but none worked well for me, so I’m doing this manually, issuing the necessary shell commands in sequence. I install bundler, install Jekyll and its dependencies, and then burn my blog with jekyll build. I won’t go into Jekyll in this post, click here to find its documentation if you need help.
Step 4: cloudflare/wrangler-action
{% raw %}
    - name: Publish to Cloudflare
      uses: cloudflare/[email protected]
      with:
          apiToken: ${{ secrets.CF_API_TOKEN }}
          environment: 'production'
      env:
          CF_ACCOUNT_ID: ${{ secrets.CF_ACCOUNT_ID }}
          CF_ZONE_ID: ${{ secrets.CF_ZONE_ID }}
          CF_EMAIL: ${{ secrets.CF_EMAIL }}
{% endraw %}
cloudflare/wrangler-action automates wrangler inside a Github action. Once your website is burned, it will use your wrangler.toml, your tokens (via Github secrets, via environment variables) and publish everything to your Cloudflare Worker.
When this step is finished, your new website should be available.
Step 5: xinthink/action-telegram
{% raw %}
    - name: Telegram notification
      if: cancelled() == false
      uses: xinthink/[email protected]
      with:
          botToken: ${{ secrets.TELEGRAM_BOT_TOKEN }}
          chatId: ${{ secrets.TELEGRAM_CHAT_ID }}
          jobStatus: ${{ job.status }}
          skipSuccess: false
{% endraw %}
xinthink/action-telegram is optional if you want to get a notification in your Telegram when the workflow finishes with the result.
Local and staging tests
You can use npm to test everything locally or upload your Worker to Cloudflare’s staging environment, using npm. See my package.json for options.
You need dotenv.
npm install dotenv -g
Then you can:
- npm run jekyll-serve - run jekyll as local server
- npm run jekyll-build - run jekyll and burn the website
- npm run dev - test the worker locally, using wrangler dev
- npm run staging - publish your worker to the staging environment at Cloudflare
- npm run publish - publish your worker to the production route, just like your Github workflow will do
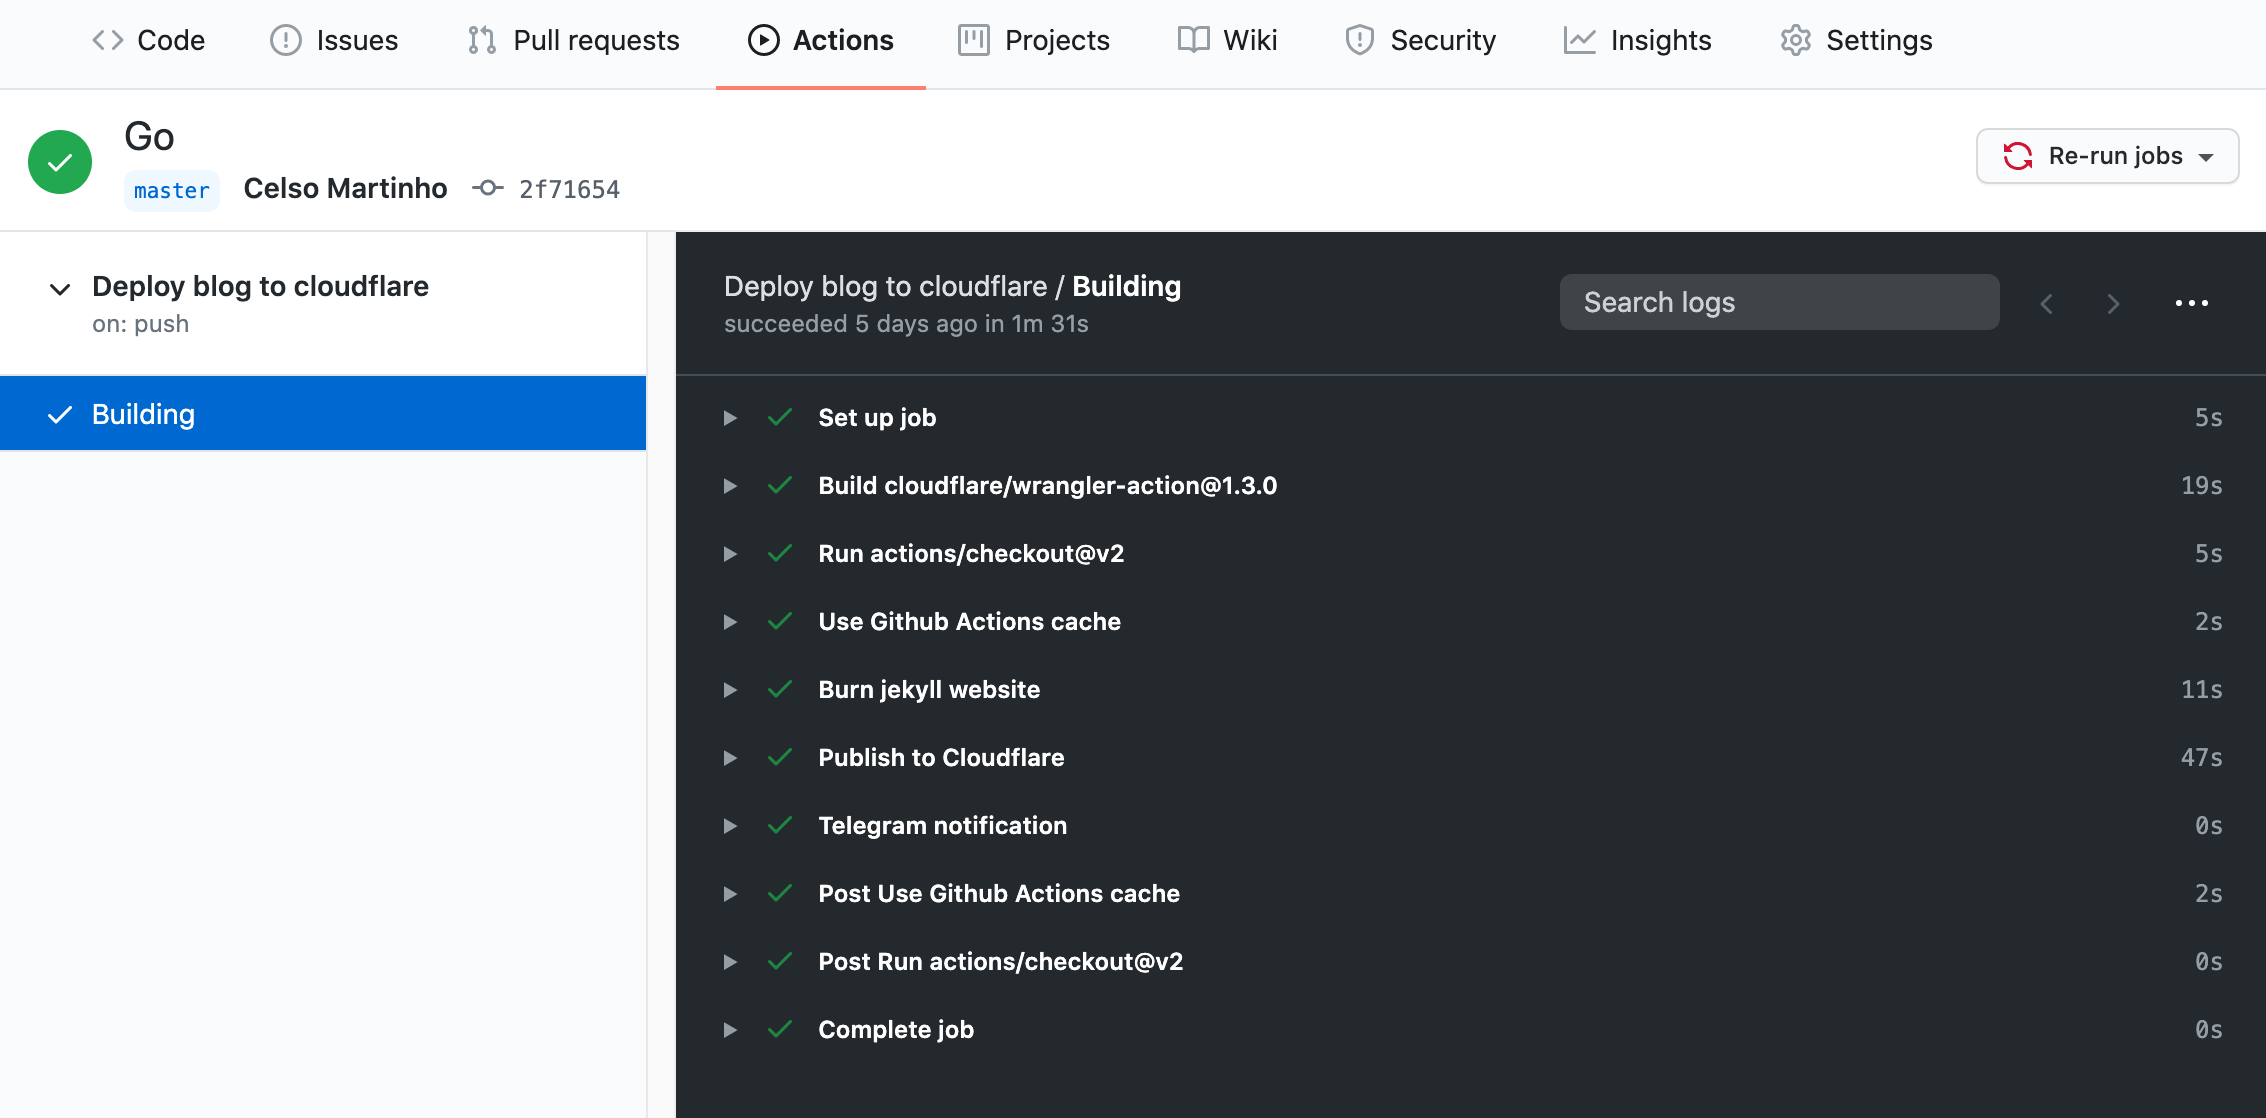
Show me
This is what you should see if your Github action workflow works as expected.
Final notes
This was fun to put together. It took me about an hour to tweak everything and get this automated workflow running. It’s the tip of the iceberg though, Cloudflare Workers have a lot of potential for other applications and I will be exploring them in the future.
I also wanted this blog repo to go public so that anyone could look around, so here it is.
I hope you find this tutorial useful. If you have questions, drop them in the issues, maybe I can help.